
Customize your rates
 Each customer is assigned to a rate plan: you can bill that customer at any of the rates contained in that plan. Rates can be as simple as you want (e.g., always charge the same amount to everyone), or as fine-tuned as you like. Terpsy is designed to take the pain out of invoicing, and will do most of the work for you. This means that the better you understand how rates work, the less time you'll spend on billing later on.
Create a new rate
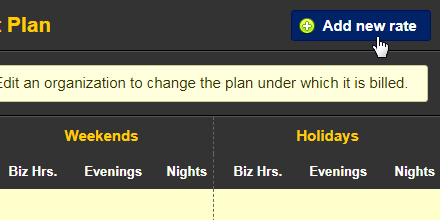 To create a new rate, go to Money › Rates, and click on the "Add new rate" button, on the right. It doesn't matter which plan is currently selected, you'll select the plan under which that new rate should go.
The rate editor will open in a popup; the first time you see it, it might look a bit scary, but don't worry. After you've created a rate once, it will seem very simple.
Rate modifiers
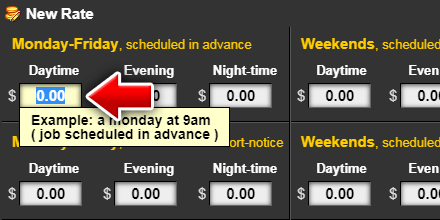 First, Terpsy has to know how much you charge based on three types of conditions:
- Daytime, evening hours, or night-time.
- Weekday, weekend, or holiday.
- Advanced notice, short-notice, or last-minute / emergency booking.
Enter an amount in the first text box, and hit the Tab key to go the next field. No need to type ".00" at the end - Terpsy will automatically add it for you if needed. A tooltip will appear and show an example when the cursor is in each of these text boxes (visible in the screenshot above).
Plan, rate name, and billing unit
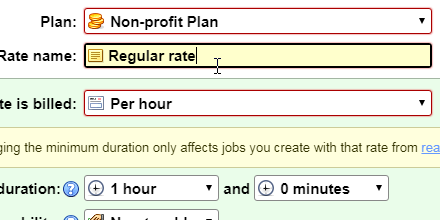 Now pick the plan for which you're creating this rate, and type a name for that rate. While customers don't see plan names, they do see the name of rates, both in the rate sheet, and also on their invoices.
Then, select the billing unit for that rate: "per minute" is ideal for transcription jobs; billing by the half-day or full-day is useful for court assignments. You can also bill per session.
Invoicing options
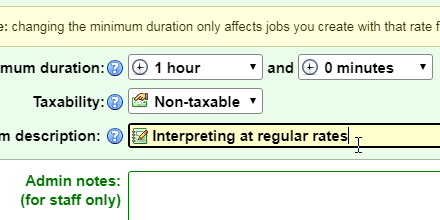 Now pick a minimum duration: for a rate charged per minute, you could pick "15 minutes." For a rate charged per session, you would typically pick 1 session as the minimum. Terpsy will bill the minimum you select, even if that job lasted less. A 45-minute job charged hourly with a 1 hour minimum would be billed for the full hour.
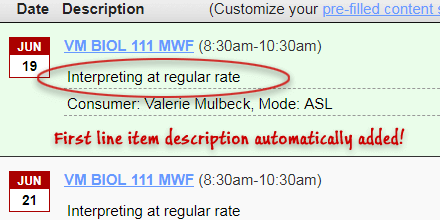 The line item description you enter, if any, will automatically be added as description for each job charged at that particular rate. This is a huge time saver, take advantage of it! The second line item description can also be automatically added: just go to Settings › Billing, and click on the "Default line items" button to select options.
Optionally add a note for yourself / your staff, and click Save: you can now assign that rate to jobs.
Customize the "taxability" of your rates
 If you never charge value-added taxes or sales taxes, you can skip this section.
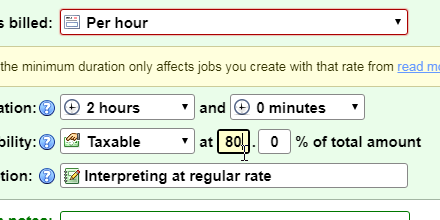
If you charge VAT or sales taxes, you can customize the taxability of each rate you create, and its percentage: is it non-taxable, fully taxable, or only partially taxable?
Let's use Texas as an example, since we're based there, and since it has quirky sales tax rules:
- In Texas, consulting services are not subject to sales taxes: in case like this, you'd enter that the rate is "Non-taxable." (In other words, 0% of that rate is subject to sales taxes.)
- In Texas, only 80% of "data processing services" (like software development) are subject to sales taxes. In a case like this, you'd enter that the rate is taxable, but you'd specify "80%."
- Web hosting services are fully taxable: in that case, you'd pick "Taxable," and keep the default of 100%. (Meaning that sales taxes will be applied on the entire amount charged to the client.)
Rate visibility (default plan only)
By default, rates are not shown to the public: but you can optionally display rates on your website and/or the public service request form. This only shares rates from your "Default Plan." You can set some rates as "private," and they will not appear on your website. Customers who are on the default plan will see all rates in their Account Manager (the app they log into to manage their account).
Edit an existing rate
Editing a rate works in much the same way. The difference is that this will impact all unbilled jobs that are attached to that rate. So, unless you've warned your clients about the rate change (assuming it's an increase), it's probably best to wait until the start of the new year, or September (the start of many organizations' fiscal year). Terpsy includes two sticky notices that you can use for that purpose:
Let your customers know about a change of rate
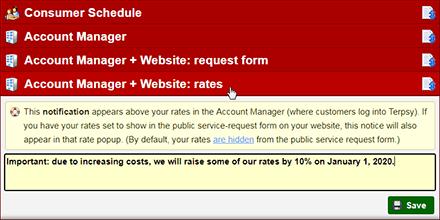 To avoid an unpleasant surprise for your customers, you can post a sticky notice informing them, well in advance, that you're about to raise your rates. To do so, go to Settings › Notices, and click on the "Account Manager + Website: rates" header. Type your notice and Save. This will display that notice above your rate sheet.
If you want to make the announcement even more prominent, you can also post that same notice under "Account Manager + Website: request form": this will display that rate-increase notice at the top of the service request form, in customer's Account Manager, and on in the form your website.